Wednesday, November 17, 2010

Finally some pics

Here are a bunch of pics of my machine and the progress I've made over the last few weeks/months.

Here's a shot of my electronics setup at the moment.  You can see the yellow shield board that used to hold the carriers.  You can see the blue screw terminals that used to hold the stepper controllers when I first started.  The green boards on the right were my first stepper carrier board version.  The board in the lower left corner connected with the large rainbow cable is my new 4 axis controller that I am testing.


Here's a pic of my heated build platform.  it is an electric skillet.  It is nice because it has it's own temp regulator.  I set the dial by checking the temp with an IR thermometer.  It holds the temp very stable.

And here's a pic of my brutstruder with the geared stepper.


And here's a pic of all the pololus and the LEDs going all flashy flashy

That's all for now.

a new extruder and another revision of stepper electronics

So I got my geared stepper in and it worked ok my MDF extruder, until the MDF started to split where I had some screws going in through the thickness of the MDF instead of through the face of it.  I went to my local hackerspace and printed out a brutstruder.  The print took about 4.5 hours on the slow Darwin in the space.  The makerbot was being calibrated at the time for a mendel print (a bunch of these were being printed and settings tweaked http://www.thingiverse.com/thing:4730), so I had to use the slower machine in the space.  The extruder works well now and I have to adjust my settings to get it working.

My plan for a heated build platform is to use an electric skillet sitting on my Y stage.  The first tests with the new extruder failed because the filament did not stick to the painters tape I had on the platform.  The heated skillet should help with adhesion.

I have also made up a new 4 axis stepper controller that has further reduced my electronics footprint.  You can see it and read the build instructions at http://www.johnyang.com/p4ac.  I had a batch made up, so if you're interested in one, drop me a note at lj.johnyang*AT*gmail*DOT*com and we can work things out.  I'm still testing things out for the next few days/week to make sure there aren't any problems with the design.

The next thing I have to do is to calibrate my machine and get it printing.  It is very close now.  I'll be trying to print a cathederal for my kids as a holiday present.  After that the next thing I have lined up I want to print is a mendel (most likely the imperial prusa mendel variant) and a replacement shell for the key fob for my car.  it is cracked and I have not had the remote for some months because of it.  I've had to actually use my key to open the car door, the horror!

Anyhow, I hope to be fully printing soon!

Thursday, October 21, 2010

New extruder stepper

So my attempt at a direct drive extruder with a stepper was a failure.  not enough torque to push the filament through the hot end.  There are designs to deal with the usual low torque of nema17 steppers.  There's Adrian's geared extruder, and then there's the popular Wade's extruder.  Rick over at Makergear is working on using a geared stepper in a direct drive extruder.  It's not out yet, but I figured a geared stepper should have enough force to use in my ugly mdf extruder.  Rick's sold out of his motors or they're all allocated for the extruder kits he's presold or something.  I dug around and found a different motor that should provide similar performance here.  It's essentially a nema17 stepper with a 26.8:1 gear reduction.  so it takes 26.8 turns of the stepper to turn the output shaft one turn.  so some quick math here: 200 steps per revolution * 26.8 = 5,360.   I think wade's gear ratio is 3.54:1.  we'll see how this works out.

RepG and the 5D firmware play nice

so I loaded up the Joaz fork of the 5D firmware I have been using on my repstrap and loaded up the latest commits of Erik's RepG changes to get it working with 5D.  I got it working and was able to control axis motion with RepG.  Thinking back, I think the tonokip firmware might have worked last night too if I had pushed the reset button like you have to do on machine connect.  The serial communications kept saying 'serial line non-responsive' or something to that effect.  The problem I found was that when you connect repg to the machine, it expects some text back from the machine.  I had the firmware booted and it was happily waiting there for gcodes.  It took me a few minutes of reloading the firmware and restarting repg and changing and checking serial baud rates before one time it said connected and the bar went green.  I clicked the reset machine button in repg and it could not reconnect.  digging through the source code for repg, I traced down the error message and determined that repg was waiting 10 seconds for some activity on the serial line.  So I shut stuff down, restarted repg, clicked the connect button, then hit the reset button on my mega and it connected right up.  I tried this a few times, and it worked every time.  Finally figured out the problem!  Then I go looking through the wiki wondering why I didn't remember this step and there it is all written out about having to hit the mobo reset button when you connect since repg v3.  Reminder to self: read the fucking manuals.  Next step is to see if the tonokip will work with repg too.

repstrap is almost all done

So it has been a while, and I have finished the Cartesian robot portion, and I made up an MDF extruder, but it does not work well.  The firmware is in and I can control it and 'print' stuff with a pencil and repsnapper.  I finally brought the camera down to the shop to take some pics.  It's an ugly machine, but it is all mine!  Here are a bunch of pics and descriptions.

Here's an overview of the whole printer

Here's a shot of the Y axis stepper and S-belt config used for motion. 

I re-did the X axis to be like the Y axis as well.  I had initially had it as a continous loop with the X/Z carriage clamped to the belt for motion, but I had a bunch of backlash/whiplash with these cheap belts so I changed it up so that there wouldn't be so much spring back when the direction changed.

and here's an overview of the back of the machine.

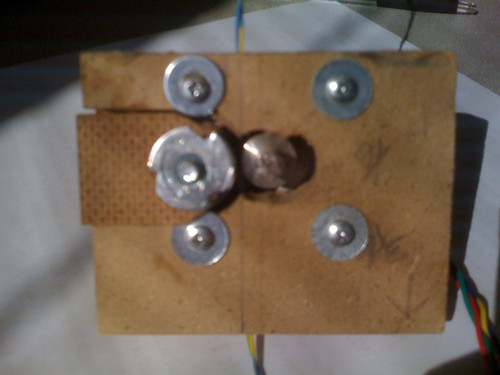
The Z axis uses a threaded rod as you can see above.  The stepper is on a mount and  floating above the X sled.  It looks like it is sitting on it, but there is a small gap there.  The threaded rod is 1/4-20.  The lead nut is made up of two barrel nuts epoxied to two sides of a metal mount (rack mount ear from some old datacenter equipment).  It's not quite an anitbacklash setup since there's no spring pushing the two nuts apart to take up the slack, but there is very little slop in this config for the moment.  The attachment between the stepper and the leadscrew is just some tubing held on with clamps.  I have to find a different way to attach this.  The stepper shaft will skip in the tubing if things bind.  This may be a good thing, but I'd rather have a solid connection here so I'll probably change it out when I get a chance.


I have min and max endstops made up as well.  They are not connected to the machine at the moment, but I will find appropriate locations and put them on so the printer can auto home when it starts a print.  I made up mechanical endstops using a contact switch and soldering on the support electronics directly to the switch.  I didn't have the PCB that is designed to hold this stuff and a nice connector, so I just slapped it on the end of some cat5 cable and crimped an end on it to fit on my stepper control boards I designed.  Here is what one looks like when it is not triggered.

And here is what one looks like if it is triggered

And here's an overview shot of my messy electronics setup.  I have an arduino mega, a home made protoboard shield (I bent pins to fit the odd 0.16 spacing of the arduino, what a pain, but this allowed me to use plain protoboard instead of doing up a design to get fabbed or going with a pre-done protoshield.) and 5 of my stepper control boards.  The protoboard takes the ATX power, and has a slide switch so I can kill power to the system to change out wiring easily.  It also has two heater and two thermistor circuits on there.


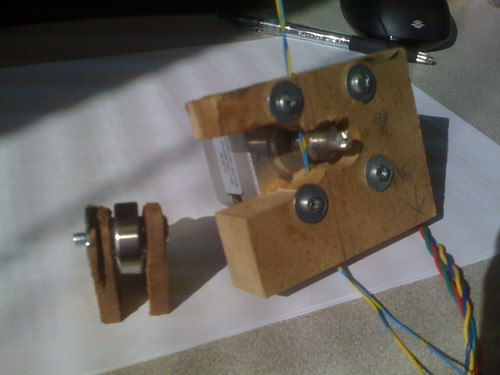
Here's a shot of my MDF extruder.  It looks ulgy, and the stepper isn't strong enough to push the filament into the hot end.  when I try to extrude, it'll push in a bit then the stepper will skip steps and stutter.  It is using a mk5 drive gear, and 5 pieces of mdf, two pieces of masonite, a 608 bearing as the idler and a bunch of screws.  The idler is pushed into the drive gear with a screw that goes through a t-nut in one of the mdf pieces to provide the force.  The hot end is a mk4 setup from MBI.  I bought a MK4 kit when they put them on sale for $60 after the MK5 came out.


And here's a pic of it oozing out some plastic.  I have to attach some insulation on it, but I wanted to keep an eye on it for the first few times to make sure things don't go bad somehow like the nichrome burning things off or shorting out or something.  So close to having this working.  I think I'll have to find/make a geared extruder (a wade's or adrian's) so that the stepper I have can push out the filament.  Or the other option is to get a geared stepper I guess, or a stepper with more torque that can push on through.

So the bulk of my build is now complete.  I'll have to find/adjust my extruder and then I can start building stuff.  And the firmware I am using is the modified-Tonokip used by ultimachine for their RAMPS setup and also the Joaz fork of the 5D firmware.  Both work fine and are configured for my machine right now, so I can switch between them.  Right now, all I can do is the simple XYZ Cartesian motion with a pen taped to the Z axis and both are fine for that.  I'll test out both as I get started printing to see if I have a preference going forward.  So hopefully the next posts will have me with a fully operational printer.

Friday, September 17, 2010

MDF extruder made

So I made the MDF extruder parts last night.  Kind of hackish, but I think it'll work.  I marked out the notes on the mdf based on a mishmash ideas from several designs online for the paxtruder, the printstruder, the metal printstruder, the basic Mk4 and the new Mk5.  Still have to finish the front/back plate  to hold in the idler bearing assembly and the tension on the idler.  Here's a pic of what it'll look like assembled.

MDF stepper extruder

and here's a view of the parts

MDF extruder parts

It has the NEMA17 stepper attached to the MDF block.  The stepper has an MBI Mk5 drive gear on the shaft.  The shaft of the stepper was 5mm I think and the bearing was designed for a 6mm shaft that is on the kysan gearmotor MBI uses so I had to pad out the stepper motor shaft size with some metal tape to get it to be a snug fit for the drive gear.  I had to do similar things with the timing belt gear pulleys.  The bearing is a standard 608 skate bearing.  I'm using a T-nut and a 10-24 screw to hold it between some masonite pieces that slide in the hole of the MDF block.  I have to get a few bits from the hardware store to finish things up.  I need a spring or some other method of applying pressure to the bearing assembly to drive it into the drive gear.  I'm thinking a spring of some sort would do nicely, or a screw mechanism like the paxtruder design. The blue/yellow wire in the picture is where the ABS filament will pass through the extruder.  I misplaced the small piece of ABS I was testing with last night, it's probably on the floor of my shop somewhere.  So once I get the idler attached, I'll be able to connect the hot end and try it out.  Hopefully I can do that tonight.  If this works and I can get the machine working, my next task will be to calibrate the machine and then print out upgrades for this extruder.  I'm planning on printing up a Wade's and a brutstruder as possible replacements.

If this works, I think I now have everything for the 3d printer.  I just have to finish assembling the pieces and get things calibrated.  So very close!

Thursday, September 16, 2010

Mechanical endstops constructed

Finished wiring up my mechanical endstops.  This should complete all the electronic bits for my repstrap.  I've got the main firmware on an Arduino Mega, 5 steppers connected to 5 of my pololu carrier boards, two thermistor circuits, and two mosfet circuits.  The endstops (min and max) are wired to connect in via the stepper drivers I made up.  There are rj45 connectors on those that accept the connections.  I've got a big box of cat5 plenum cable, so I wired up my own cables.  For the actual mechanical endstop end, I just deadbugged the components to the side of the SPDT switch.  I used the following schematic for wiring up the stops. http://code.google.com/p/makerbot/downloads/detail?name=makerbot-mechanical-endstop-1.1-r1.zip

don't have any picture of the setup, but I'll scan in a pic of the cables later.  I have to do a whole write up of the process and my design when I'm done.

I've also decided to try to take several paths forward on my extruder.  I will be making an extruder to hold my stepper out of mdf that I will mount the hot end to.  I will also be headed to my local hackerspace to see if I can get a Wade's extruder printed there on the Darwin they have.  I will also be trying to see if I can get a metal frame extruder built in case the MDF one won't work.  If I can get the MDF or metal one to work, I'll promptly be printing a wade's and also a brutstruder.  Or if neither the MDF or metal extruder are able to be made, I'll be working to get the Darwin printing and print out a wade's at the hackerspace.  The hackerspace route may take the longest, since I am only able to make it out there once a week on Monday nights after the kids head to bed.  but with these options, I hope to have a functional printer soon.  If I can't get any of these things to work, I'll buy a stepper brutstruder from Makergear, but I think I can get things working.  I've been trying to build this machine up from bare basics as much as possible to learn everything I can about the reprap/repstrap process.  I hope my MDF route works, since it is the easiest and fastest route forward that I can see.

Monday, September 13, 2010

Z axis back to leadscrew

So I had plans to belt drive my z axis but it just wouldn't work. The axis is too heavy and my counterweight plan didn't work because of the weight of the axis and because the pulleys had too much friction. So I'm back to a leadscrew for the z. It is a 1/4-20 all thread studding. I had problems figuring out how to mount it before but last night I got most of it layed out. Before I was trying to put the motor at the top on the front and have the captured nut right next to the platform. Now I cut out a panel in the support and the motor sits on the bottom with the threaded rod pointing up. The captured nut is back behind the z slides and attached to the z sled with some angle iron (actually some rack mount ears from some old router or switch.) This should solve the problem I had before with the support of the far end of the driven rod. When I had leadscrews on the x and y they would bind up because I was supporting the side of the rod away from the motor in makeshift pillowblocks. The three parts weren't in alignment and so would bind up. I figured out that you didn't really need to support the far end anyhow. So with this verticle setup with the motor ar the bottom is easer than the motor at the top since I don't have to worry about support it alignment of a far end point.

Still have to figure out a coupling that works. I've been using tubing but I need proper pipe/tube clamps. I'll pick some up at the hardware store tomorrow. I had made do with zipties connecting things but it would slip if the rod binded. I may do a coupling connector from the hardware store ifit I can drill and tap some grubscrews into them. Well see how it goes tonight

Saturday, September 11, 2010

Belts in for x and y axis

So I just finished putting the belts in for the x and y.  the x is a simple continous loop with a clamp tied to the belt that connects to the x sled.  The Y is in an S-configuration.  Here's a pic


and here's a close up of the stepper and the way the belt goes through.

The metal frame that the stepper and idler pulley is attached to is a piece of metal angle used for joist or rafter support, I think.  It was $0.89 each at the hardware store.  I had to bore out the holes for the center shaft, and add in mounting holes for the stepper, but it was an easy way to mount the stepper 90 degrees.

The x and y moved when sent commands via repsnapper.  I still have to adjust my firmware to dial in the correct number of steps per mm and such, but I'll do all of the axis at one time.  I need to finish my counterweight on my z head, then it will be driven with a belt too.  I'm working on a stepper driven extruder to get me though testing and printing out a wades extruder to replace it.  I think I'm going to make a printstrucer with mdf, kind of like the aluminum one that is in thingiverse.  I bought a mk4 printstruder from MBI, but I've got my own RAMPS shield going and don't have a dc motor controller on it, just a bunch of pololu stepper controllers.  So I'm trying to make it work.  using the hot end, and may try to fit a stepper in the mk4, but we'll see.

Here's a pic of my electronics

It's a big hairy mess of jumper wires on the mega shield.  I moved the pololu boards off onto my pololu carrier boards and put headers on the shield.  It cost more, but I think it'll be a cleaner look.  I've got the pololu connectors still on the shield, so I could go back to that, but I was afraid that my jumper wires wouldn't be able to carry the current. (I'm using telco cross connect wires, I work in IT and I've got a box full of random length spools that I've picked up over the years in telco closets and it rooms.  As things went voip, not much need to do ratsnest crossconnects on 66 blocks for voice lines in the office, so I got to keep the remnants of the cross connect wire from various jobs as I did the voip transition)

Monday, August 30, 2010

Instructions for the PSCC v1.3

So I wrote up some instructions on how to put together the Pololu controller carrier board.  The board is fairly simple, but I put together some step by step instructions with pictures.  You'll have to solder on the through hole components, so be ready with your iron, solder, diagonal cutter and other tools you'll need to solder.

http://www.johnyang.com/www/pscc

Wednesday, August 25, 2010

stepper boards work great

Finished rewiring my arduino mega shield and plugged in the stepper controller and it worked great.  Had to make one adjustment to one of the resistors.  Had to change R2, the pullup resistor used with the jumpers to select the microstepping from 100K Ohms to 10K Ohms.  There are 100K Ohm pulldown resistors built into the pololu controller, and I pull down MS1 with a 100K Ohm resistor for when that pin isn't jumpered.  When I had everything plugged up, it only did full steps, no matter what combination of jumpers I set.  So I replaced the resistor on the pullup side to 10K Ohms and now all the microstepping options work great.  Now to solder up 3 more boards and hook things up to my repstrap.

I've got 15 boards to sell, if you want one, let me know.

Tuesday, August 24, 2010

stepper driver soldered up

Just finished up soldering up one of the pololu carrier boards I had made up.
Here's the board with all the components


And here it is all soldered up


And here's a picture of the board layout


It's late so I'll have to test it tomorrow.  I have to solder up some headers on my arduino mega protoboard shield.  I had the pololu drivers on the protoboard shield, but I want to remake the shield so it'll be pin compatible with the makerbot gen4 electronics.  I rewired my shield, but it is a big mess of jumper wires, and I figured it'd be cleaner to make a carrier for the pololu board and remake the shield.

stepper boards arrived

The stepper controller carriers I designed were made and arrived a few weeks ago.  I finalized the BOM and ordered the parts and those are in too.  I'll be building a few stepper carrier boards tonight and documenting the process.  I hope I didn't leave anything out when I made up the PCB design.  We'll find out tonight.

belting up

So while waiting for the components for my stepper boards to arrive, I was digging around amazon and found some pulleys and belts that I could use to switch my wolstrap based repstrap from 1/4-20 leadscrews to belts.

Here are the pulleys I bought: Timing Belt Pulley Nylon Glass Filled, Double Flange, 1/5

and here are the belts:Timing Belt Fiberglass Reinforced Neoprene, One-Sided, 1/4

The belts were on sale for $0.57 so it was hard to pass the deal up.  Regular price was $7 something.  The belts are 30" loop.  so it is enough to provide the 12" motion for my X axis as the continuous loop.  For the Y axis I'm going to mount the stepper to the platform and use a S routing of the belt to provide motion since I have around 20" of motion in that direction.

I also bought some skate bearings from amazon to use for the idlers for the belt.  These Skate Bearings are the ones I bought.  Although I'm sure any 608 bearing would work fine.  Or any size really, but the skate bearings seemed the cheapest.  Looks like Makerbot has them for $5 which is less than half what I paid.  I have a prime shipping account with amazon for our other household ordering, so no shipping fees, but any bearings work fine.  I'm using 5/8" bolts and fender washers to do up the idler bearings for the X axis.

I'll post up some pictures this evening of my belt setup.  I'll also try to add some details to the wolfstrap page on the reprap wiki.

Wednesday, July 28, 2010

Electronics progress

Yet another pololu carrier board
pololu carrier board

So I've got most of the mechanics done, but I'm looking to rebuild it with belts instead of the leadscrews.  While I'm trying to design a workable belt system with some scraps I have from a few steppers, I've been working on the electronics side.  I've got the stepper drivers finished and will be sending it out to a boardhouse in the next few days and hopefully will have some boards built in a little while.  I've uploaded pics of my design on the reprap wiki and thingiverse.
http://reprap.org/wiki/Pololu_Electronics#ljyang
http://www.thingiverse.com/thing:3634

I'm still putting the final touches on the silkscreen before I send it out for prototype and will post up the final design files for the board soon.

Tuesday, June 8, 2010

New build, new blog

So I've been reading about the reprap project for a while, and I thought it was time to actually start my build.  I'll be building a combined cncrouter/repstrap.  I've been going over things and I think that I have a good base of knowledge now and a design sketched out to build.  I am building a variant of the Wolfstrap machine.  The Y base and X standards are being built from a re-purposed Ikea Rast nightstand I had in my shop.  I will be using an arduino mega with Pololu stepper drivers for movement.  I will be building the Cartesian robot first then integrating the electronics so that I can hopefully use both reprap software with the arduino, and EMC2 from linuxcnc.org for a cnc router.  I am hoping to accomplish this by decoupling the stepper drivers from the arduino in some manner and connecting the cabling to a parallel port for the Linux cnc control.

I am keeping records of my purchases so that I can calculate my total build cost and also provide a complete BOM after it is completed.  I am working on this in the evenings and hope to finish and have my first print by the end of 2010.  I am being realistic with my goal given my two children take most of my time and I have only 1-2 hours in the evening 2-3 days a week to work on this project.  Progress will likely be slow, but hopefully will be completed by the end of the year, or hopefully sooner.

Items already in hand:
Ikea rast
4x steppers (nema 17 from sparkfun)
5x pololu stepper drivers (from pololu.com)
1/4-20 threaded rod (from home depot, had it in my shop from a previous project, some of it is a bit bent so hopefully can get it to work)
1/4-20 nuts (also from home depot from the previous projects)
10-24 x1.5inch screws, nuts and washers.
Arduino Duemilanove (using it to test out stepper drivers, need to order a mega)
drawer slides for linear motion - 2x 22", 1x 14". 22" for x/y motion, 14" for z motion (home depot)
breadboard for prototyping
miscellaneous passive electronic components (resistors, capacitors, etc)
PC power supply
atx breakout connector (from sparkfun)

Items to buy/make
breakout board/shield for mega to house stepper drivers
Arduino Mega
extruder

I'll post pictures as progress is made.
LJ