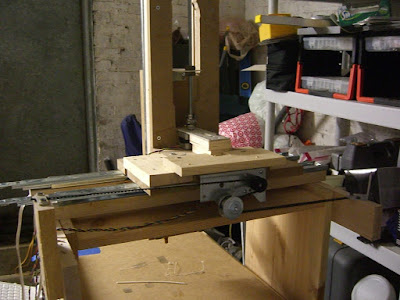
Here's an overview of the whole printer
Here's a shot of the Y axis stepper and S-belt config used for motion.
I re-did the X axis to be like the Y axis as well. I had initially had it as a continous loop with the X/Z carriage clamped to the belt for motion, but I had a bunch of backlash/whiplash with these cheap belts so I changed it up so that there wouldn't be so much spring back when the direction changed.
and here's an overview of the back of the machine.
The Z axis uses a threaded rod as you can see above. The stepper is on a mount and floating above the X sled. It looks like it is sitting on it, but there is a small gap there. The threaded rod is 1/4-20. The lead nut is made up of two barrel nuts epoxied to two sides of a metal mount (rack mount ear from some old datacenter equipment). It's not quite an anitbacklash setup since there's no spring pushing the two nuts apart to take up the slack, but there is very little slop in this config for the moment. The attachment between the stepper and the leadscrew is just some tubing held on with clamps. I have to find a different way to attach this. The stepper shaft will skip in the tubing if things bind. This may be a good thing, but I'd rather have a solid connection here so I'll probably change it out when I get a chance.
I have min and max endstops made up as well. They are not connected to the machine at the moment, but I will find appropriate locations and put them on so the printer can auto home when it starts a print. I made up mechanical endstops using a contact switch and soldering on the support electronics directly to the switch. I didn't have the PCB that is designed to hold this stuff and a nice connector, so I just slapped it on the end of some cat5 cable and crimped an end on it to fit on my stepper control boards I designed. Here is what one looks like when it is not triggered.
And here is what one looks like if it is triggered
And here's an overview shot of my messy electronics setup. I have an arduino mega, a home made protoboard shield (I bent pins to fit the odd 0.16 spacing of the arduino, what a pain, but this allowed me to use plain protoboard instead of doing up a design to get fabbed or going with a pre-done protoshield.) and 5 of my stepper control boards. The protoboard takes the ATX power, and has a slide switch so I can kill power to the system to change out wiring easily. It also has two heater and two thermistor circuits on there.
Here's a shot of my MDF extruder. It looks ulgy, and the stepper isn't strong enough to push the filament into the hot end. when I try to extrude, it'll push in a bit then the stepper will skip steps and stutter. It is using a mk5 drive gear, and 5 pieces of mdf, two pieces of masonite, a 608 bearing as the idler and a bunch of screws. The idler is pushed into the drive gear with a screw that goes through a t-nut in one of the mdf pieces to provide the force. The hot end is a mk4 setup from MBI. I bought a MK4 kit when they put them on sale for $60 after the MK5 came out.
And here's a pic of it oozing out some plastic. I have to attach some insulation on it, but I wanted to keep an eye on it for the first few times to make sure things don't go bad somehow like the nichrome burning things off or shorting out or something. So close to having this working. I think I'll have to find/make a geared extruder (a wade's or adrian's) so that the stepper I have can push out the filament. Or the other option is to get a geared stepper I guess, or a stepper with more torque that can push on through.
So the bulk of my build is now complete. I'll have to find/adjust my extruder and then I can start building stuff. And the firmware I am using is the modified-Tonokip used by ultimachine for their RAMPS setup and also the Joaz fork of the 5D firmware. Both work fine and are configured for my machine right now, so I can switch between them. Right now, all I can do is the simple XYZ Cartesian motion with a pen taped to the Z axis and both are fine for that. I'll test out both as I get started printing to see if I have a preference going forward. So hopefully the next posts will have me with a fully operational printer.


No comments:
Post a Comment