So I wrote up some instructions on how to put together the Pololu controller carrier board. The board is fairly simple, but I put together some step by step instructions with pictures. You'll have to solder on the through hole components, so be ready with your iron, solder, diagonal cutter and other tools you'll need to solder.
http://www.johnyang.com/www/pscc
Monday, August 30, 2010
Wednesday, August 25, 2010
stepper boards work great
Finished rewiring my arduino mega shield and plugged in the stepper controller and it worked great. Had to make one adjustment to one of the resistors. Had to change R2, the pullup resistor used with the jumpers to select the microstepping from 100K Ohms to 10K Ohms. There are 100K Ohm pulldown resistors built into the pololu controller, and I pull down MS1 with a 100K Ohm resistor for when that pin isn't jumpered. When I had everything plugged up, it only did full steps, no matter what combination of jumpers I set. So I replaced the resistor on the pullup side to 10K Ohms and now all the microstepping options work great. Now to solder up 3 more boards and hook things up to my repstrap.
I've got 15 boards to sell, if you want one, let me know.
I've got 15 boards to sell, if you want one, let me know.
Tuesday, August 24, 2010
stepper driver soldered up
Just finished up soldering up one of the pololu carrier boards I had made up.
Here's the board with all the components

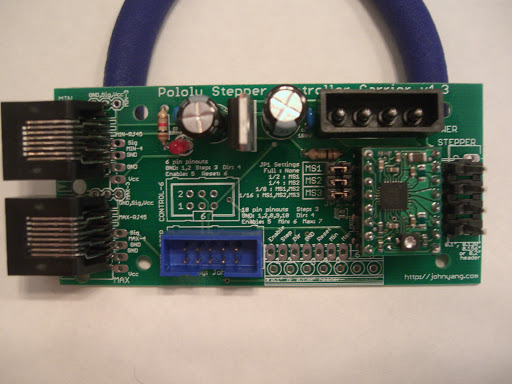
And here it is all soldered up
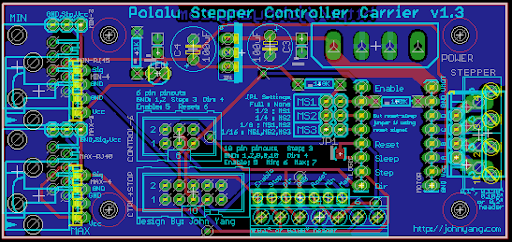
And here's a picture of the board layout
It's late so I'll have to test it tomorrow. I have to solder up some headers on my arduino mega protoboard shield. I had the pololu drivers on the protoboard shield, but I want to remake the shield so it'll be pin compatible with the makerbot gen4 electronics. I rewired my shield, but it is a big mess of jumper wires, and I figured it'd be cleaner to make a carrier for the pololu board and remake the shield.
Here's the board with all the components
And here it is all soldered up
And here's a picture of the board layout
It's late so I'll have to test it tomorrow. I have to solder up some headers on my arduino mega protoboard shield. I had the pololu drivers on the protoboard shield, but I want to remake the shield so it'll be pin compatible with the makerbot gen4 electronics. I rewired my shield, but it is a big mess of jumper wires, and I figured it'd be cleaner to make a carrier for the pololu board and remake the shield.
stepper boards arrived
The stepper controller carriers I designed were made and arrived a few weeks ago. I finalized the BOM and ordered the parts and those are in too. I'll be building a few stepper carrier boards tonight and documenting the process. I hope I didn't leave anything out when I made up the PCB design. We'll find out tonight.
belting up
So while waiting for the components for my stepper boards to arrive, I was digging around amazon and found some pulleys and belts that I could use to switch my wolstrap based repstrap from 1/4-20 leadscrews to belts.
Here are the pulleys I bought: Timing Belt Pulley Nylon Glass Filled, Double Flange, 1/5
and here are the belts:Timing Belt Fiberglass Reinforced Neoprene, One-Sided, 1/4
The belts were on sale for $0.57 so it was hard to pass the deal up. Regular price was $7 something. The belts are 30" loop. so it is enough to provide the 12" motion for my X axis as the continuous loop. For the Y axis I'm going to mount the stepper to the platform and use a S routing of the belt to provide motion since I have around 20" of motion in that direction.
I also bought some skate bearings from amazon to use for the idlers for the belt. These Skate Bearings are the ones I bought. Although I'm sure any 608 bearing would work fine. Or any size really, but the skate bearings seemed the cheapest. Looks like Makerbot has them for $5 which is less than half what I paid. I have a prime shipping account with amazon for our other household ordering, so no shipping fees, but any bearings work fine. I'm using 5/8" bolts and fender washers to do up the idler bearings for the X axis.
I'll post up some pictures this evening of my belt setup. I'll also try to add some details to the wolfstrap page on the reprap wiki.
Here are the pulleys I bought: Timing Belt Pulley Nylon Glass Filled, Double Flange, 1/5
and here are the belts:Timing Belt Fiberglass Reinforced Neoprene, One-Sided, 1/4
The belts were on sale for $0.57 so it was hard to pass the deal up. Regular price was $7 something. The belts are 30" loop. so it is enough to provide the 12" motion for my X axis as the continuous loop. For the Y axis I'm going to mount the stepper to the platform and use a S routing of the belt to provide motion since I have around 20" of motion in that direction.
I also bought some skate bearings from amazon to use for the idlers for the belt. These Skate Bearings
I'll post up some pictures this evening of my belt setup. I'll also try to add some details to the wolfstrap page on the reprap wiki.
Subscribe to:
Posts (Atom)